Madrona Appliance Tutorial - Customization
- Downloaded and installed the Madrona Appliance
- Have the virtual machine (VM) up and running.
- Created an app with the Madrona App Generator
This section will expose you to the django admin, django templates and models, and basic KML. First off we’re going to switch over to the Django development server.
Running the development server
Your app is currently running with the Apache Web Server which is ideal for publishing a site to the public but not for development. For development Django offers a special development server that, among other things, will automatically refresh when you change one of the Python code files.
-
In your LXTerminal window, change to the django app directory:
cd /usr/local/userapps/testappDemoProject -
Then, run the development server with the following command:
python manage.py runserver 0.0.0.0:8000
Group Collaboration
Madrona provides a robust mechanism for sharing features between users. By default, all features you create under a single account are accessible by that user alone. But users can be made members of groups and can choose to share features with group members who can then view them, copy them, share them back with revisions, etc. This allows for truly collaborative multi-user workflows while maintaining privacy of data.
The first step is to use Django’s admin site to create users and groups.
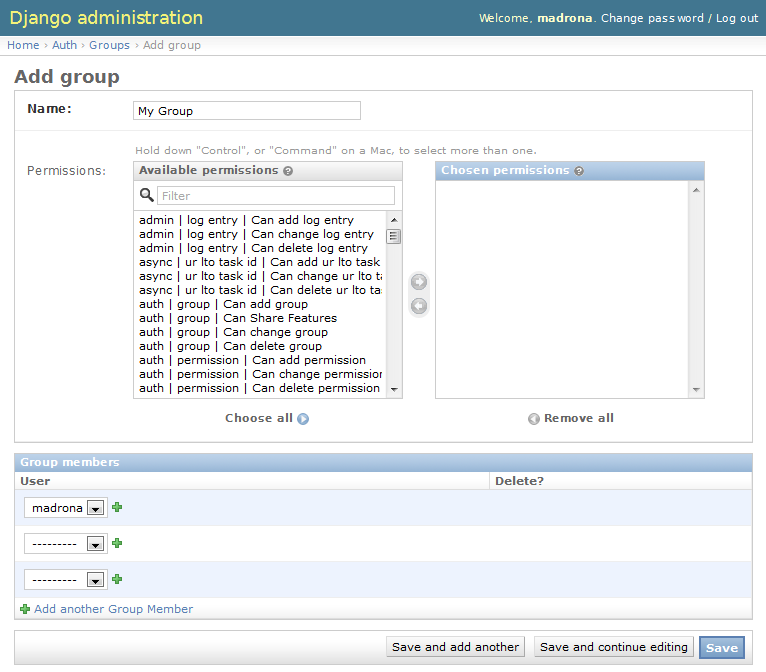
- Navigate to http://madrona:8000/admin/auth/ and click the + Add button next to Groups. Give the group the name, ‘My Group’, and add the ‘madrona’’ user to it. then click the Save button.
-
Of course you, the madrona user, are the only member of this group at the moment! Go back to http://madrona:8000/admin/auth/ and click the + Add button next to Users and follow the instructions on-screen to create another user and add them to the My Group group.
-
Back at the command line (LXTerminal), stop the development server by typing Ctrl-C. Now type the following command to enable sharing for available groups:
python manage.py enable_sharing --all -
Finally, restart the developement server again by typing:
python manage.py runserver 0.0.0.0:8000
Go back to your host web browser and reload your application. You should now be able to share features with other users by selecting a feature and then clicking Edit and then Share. Features that are shared with another user will be viewable by that other user in their Shared with Me tab.
About page
In your text editor, assuming you already have the /usr/local/userapps/testappDemoProject folder open, open the file testappdemoproject/templates/news/about.html. This is a Django HTML template. This particular template is loaded into the panel next to the map when your app first loads. Now change the text to the following:
    { load appname }
    <h1> About { appname }</h1>
    <p> This app exists as an example to highlight some of the functionality
    of the Madrona framework. </p>
Now save your file, if your terminal window is visible you should see the develpment server reload these changes. Now refresh your browser and you should see the new about page content
Verbose name
The first obvious step is to change how our feature name appears on screen. We can supply custom text using verbose_name in the feature’s Options class. Give yours a verbose_name of ‘Areas of Interest’:
@register
class AOI(PolygonFeature):
    description = models.TextField(null=True, blank=True)
    class Options:
        form = 'testapp.forms.AOI'
        verbose_name = 'Areas of Interest'
Other Options are available, see the Feature options docs.
Generating custom reports
The default template for the AOI feature (what you see when you double-click a feature under My Shapes) just prints out some basic details by default including the feature name, who created it, when they created it, the description, the area of the AOI, etc. Let’s customize it and report the acreage for the polygon.
-
In your text editor, open testappdemoproject/templates/aoi/show.html. There you will see a django html template responsible for creating the attributes page.
-
In your AOI model, below your verbose_name, add a new property called acres that returns acreage as seen below::
@register class AOI(PolygonFeature): description = models.TextField(null=True, blank=True) class Options: form = 'testapp.forms.AOI' verbose_name = 'Areas of Interest' @property def acres(self): area_meters = self.geometry_final.area conversion = 0.000247105381 area_acres = area_meters * conversion return area_acres -
Save that file. Now add the new information to your feature’s show template. In your text editor, open testappdemoproject/templates/aoi/show.html
-
Insert the following at line 15, just below the reporting of Polygon Area and above the
. instance refers to the current AOI feature being reported on::<p>Acreage is </p> -
Save that file. Now refresh your browser. Double-click one of your AOI features you created under ‘My Shapes’. You will now see that acreage is reported.
The reporting can get as detailed and complex as your needs require and can leverage GeoDjango geometry operations as well as any spatial analysis supported by Python.
Customizing KML styling
Every feature class has a default kml and kml_style properties which defines the KML representation of that feature. If you want to customize the look and behavior of your map features, you can override the kml property in your feature model. In testapp/models.py:
    @register
    class AOI(PolygonFeature):
        description = models.TextField(null=True, blank=True)
        class Options:
            form = 'testapp.forms.AOI'
            verbose_name = 'Areas of Interest'

        @property
        def kml(self):
            return """
            <Placemark id="%s">
                <name>%s</name>
                <styleUrl>#%s-default</styleUrl>
                <ExtendedData>
                    <Data name="name"><value>%s</value></Data>
                    <Data name="dsc"><value>%s</value></Data>
                    <Data name="acres"><value>%s</value></Data>
                </ExtendedData>
                %s
            </Placemark>
            """ % (self.uid,
                self.name,
                self.model_uid(),
                self.name, self.date_modified, self.acres,
                self.geom_kml)

        @property
        def kml_style(self):
            return """
            <Style id="%s-default">
                <PolyStyle>
                    <color>ffc00000</color>
                </PolyStyle>
                <BalloonStyle>
                    <bgColor>ffeeeeee</bgColor>
                    <text> <![CDATA[
                        <font color="#1A3752"><strong>$[name]</strong></font>
                        <p>Area: $[acres] acres</p>
                        <p>$[desc]</p>
                    ]]>
                    </text>
                </BalloonStyle>
            </Style>
            """ % self.model_uid()
The above will change the color and transparency of the polygon and modify the contents of the KML placemark balloon (showing Name, Description and Acres).
Ultimately, whatever you can do with KML, you can do with your feature’s KML representation. However, there are some important guidelines to follow; For more information, see the kmlapp documentation.
Handling geometries through manipulators
The :ref:manipulators <manipulators> app provides ways to validate user-drawn geometries and make sure they conform to rules that you define.
For example, you may want to limit user-drawn shapes to be within the study region. For this case, there is a built in manipulator called ClipToStudyRegion which will, as the name suggests, clip a user-drawn shape to the coundary of the study region:
    @register
    class AOI(PolygonFeature):
        description = models.TextField(null=True, blank=True)
        class Options:
            form = 'testapp.forms.AOI'
            verbose_name = 'Areas of Interest'
            manipulators =  ['madrona.manipulators.manipulators.ClipToStudyRegionManipulator']
You can also choose from several other built-in manipulators, define custom manipulators or make them optional. For more information, see the manipulators documentation.
Managing basemaps and KML datasets
Base data layers are managed using a single KML file called the public layers list. If you defined KML layers when setting up your initial app, the layers list will be available at http://madrona:8000/admin/layers/publiclayerlist/1/ . Download the public.kml file and open it in a text editor. You’ll see that it is a standard KML file with a NetworkLink pointing to each base data layers. We can modify it by adding another KML NetworkLink:
    <NetworkLink id="global-marine">
        <name>Global Marine</name>
        <visibility>0</visibility>
        <Link>
        <href>http://ebm.nceas.ucsb.edu/GlobalMarine/kml/marine_model.kml</href>
        </Link>
    </NetworkLink>
Once we’ve modified the public kml, browse to admin interface at http://madrona:8000/admin/layers/publiclayerlist/add/ and use it to upload the new KML file. After refreshing your browser cache, you should see the new KML available in the layers panel.
For more information, see the layers documentation.
Custom Links: Extending the API
Many default API actions are defined out-of-box for Madrona Features (Create, Edit, Delete, KML download, etc.). If you want to provide other methods of accessing your features, Madrona provides a link option to extend the API.
For example, let’s say we want to provide a simple text file download for your area of interest. This would involve two steps:
-
Add a link to your feature Options in testapp/models.py:
from madrona.features import alternate @register class AOI(PolygonFeature): description = models.TextField(null=True, blank=True) class Options: form = 'testapp.forms.AOI' verbose_name = 'Areas that interest me' manipulators = [] 'madrona.manipulators.manipulators.ClipToStudyRegionManipulator' ] links = ( alternate('Text file', 'testapp.views.aoi_text', select='single multiple', type='text/csv' ), ) -
Create a view to handle the creation of text files for one or more features. Open testapp/views.py and add the following function:
from django.http import HttpResponse

def aoi_text(request, instances):
    text = "Name, Description, Acres\n"
    for f in instances:
        text += "%s, %s, %f\n" % (f.name, f.description, f.acres)
    return HttpResponse(text)
Now restart the application, clear the cache and you should see Text File as an option in the download menu.
For more information about extending the API through links and views, consult the Features documentation
- Tutorial: Installation of Madrona from scratch
- Tutorial: Creating your first Madrona app from scratch
- Deployment with Apache